Create Your Own Realtime Voice-to-Voice AI Chatbot with Code Examples
Emma Ke
on October 23, 20247 min read
Introduction
In our previous article, How to Implement OpenAI's Realtime API for Real-Time Interactions, we discussed the significance of using OpenAI's Realtime API for ChatGPT voice interactions. We provided a high-level overview of creating a real-time voice-to-voice AI chatbot. In this article, we will delve into detailed code examples to help you build your own real-time voice-to-voice AI chatbot using a Voiced RAG (Retrieval Augmented Generation) flow to answer questions based on your knowledge base.
Preparation
Before diving into the code, ensure you have the following:
-
GPT-4o-Realtime API: This API supports audio input and output, enabling real-time, natural voice interactions. It empowers developers to create innovative voice applications. For more details, refer to the OpenAI API documentation.
-
Azure's AI Search: This cloud-based search service allows you to upload and query your knowledge base using semantic search. It serves as the RAG flow for the voice-to-voice AI chatbot. Alternatively, you can build your own RAG data pipeline using free vector databases like PostgreSQL with the pgvector extension.
-
Basic Chat Frontend and Backend: We recommend using React or Next.js for the frontend and Node.js with Express or Python for the backend server.
High-Level Design
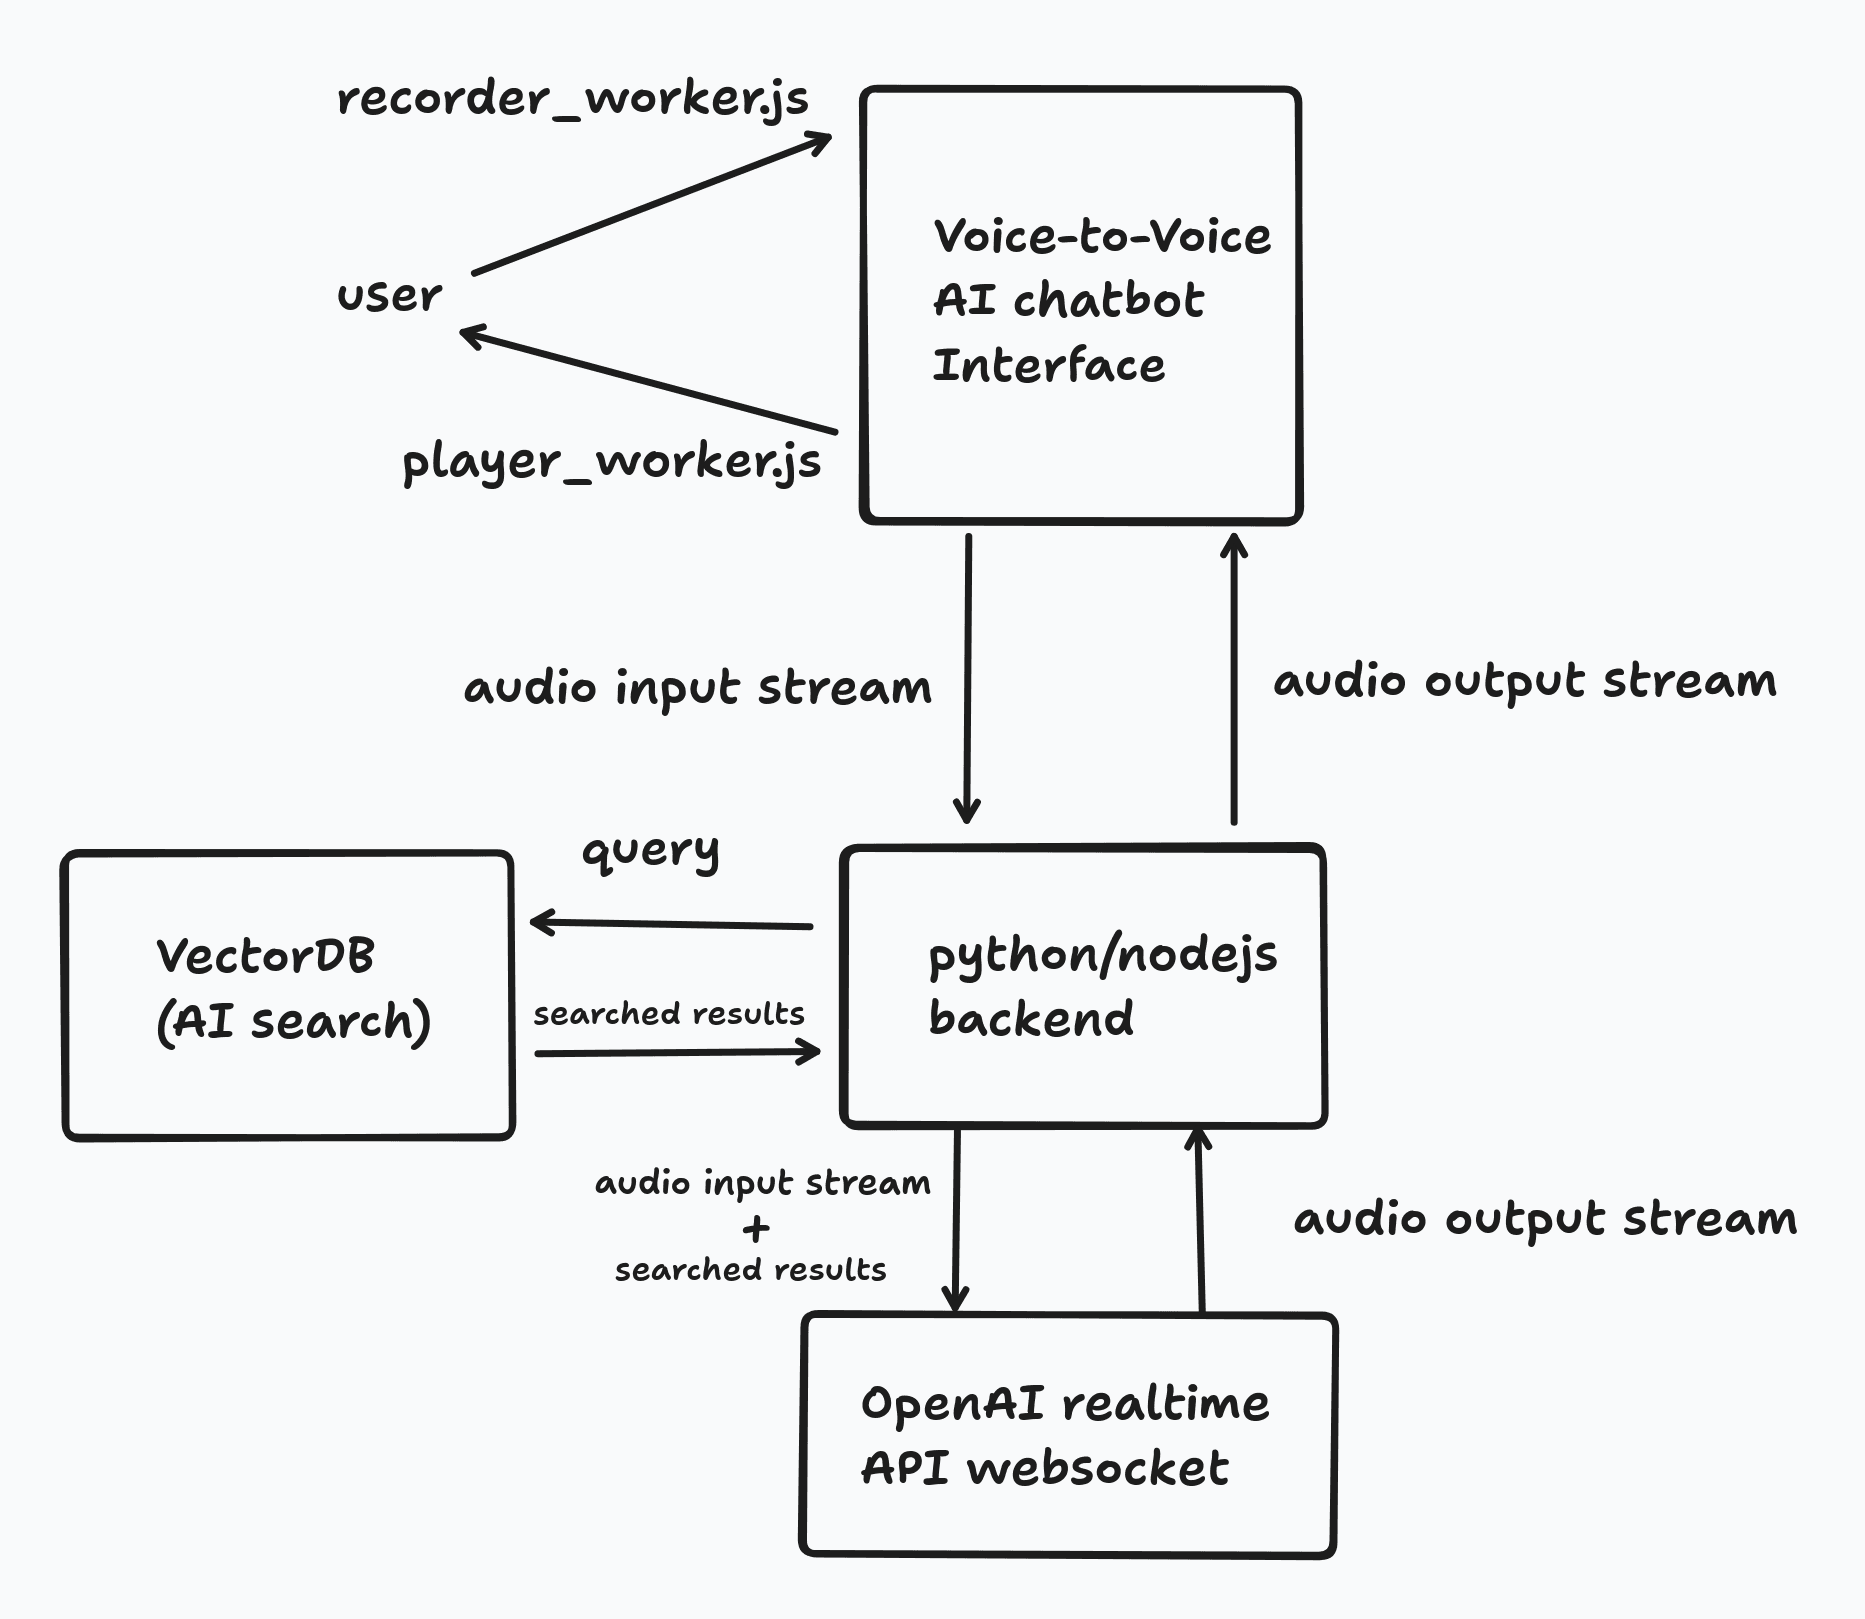
The frontend chatbot interface captures voice input from the user and plays audio output. To achieve continuous voice interaction, a WebSocket connection between the frontend and backend is necessary. Although OpenAI's Realtime API supports WebSocket connections directly, a middleware WebSocket server is required to relay audio streams securely, preventing exposure of your OpenAI API credentials.
The backend server utilizes Azure's AI Search to query the knowledge base documents, enabling the OpenAI Realtime API to answer user questions. Below is a high-level design of the voice-to-voice AI chatbot:
Example Code Snippets
Recorder Worker
The recorder_worker.js handles audio input with start() and stop() functions. The frontend should call start() when the session begins and stop() to end or mute audio input.
import { AudioProcessorSrc } from './worklets/audio_processor.js';

export class Recorder {
  constructor(onDataAvailable) {
    this.onDataAvailable = onDataAvailable;
    this.scriptSrc = AudioProcessorSrc;
    this.audioContext = null;
    this.mediaStream = null;
    this.mediaStreamSource = null;
    this.workletNode = null;
  }

  async start(stream) {
    try {
      if (this.audioContext) {
        await this.audioContext.close();
      }

      this.audioContext = new AudioContext({ sampleRate: 41000 });

      await this.audioContext.audioWorklet.addModule(this.scriptSrc);
      this.mediaStream = stream;
      this.mediaStreamSource = this.audioContext.createMediaStreamSource(this.mediaStream);

      this.workletNode = new AudioWorkletNode(this.audioContext, 'audio-processor-worklet');
      this.workletNode.port.onmessage = (event) => {
        this.onDataAvailable(event.data.buffer);
      };

      this.mediaStreamSource.connect(this.workletNode);
      this.workletNode.connect(this.audioContext.destination);
    } catch (error) {
      console.error('Error starting audio recorder:', error);
      this.stop();
    }
  }

  async stop() {
    if (this.mediaStream) {
      this.mediaStream.getTracks().forEach((track) => track.stop());
      this.mediaStream = null;
    }

    if (this.audioContext) {
      await this.audioContext.close();
      this.audioContext = null;
    }

    this.mediaStreamSource = null;
    this.workletNode = null;
  }
}
Player Worker
The player_worker.js handles audio output with start() and stop() functions. The frontend should call start() when the session begins and stop() to end or mute audio output.
class AudioPlayer {
    constructor() {
        this.player = null;
    }

    init(sampleRate) {
        this.player = new Player();
        this.player.init(sampleRate);
    }

    play(base64Audio) {
        const binary = atob(base64Audio);
        const bytes = Uint8Array.from(binary, c => c.charCodeAt(0));
        const pcmData = new Int16Array(bytes.buffer);

        this.player.play(pcmData);
    }

    stop() {
        this.player.stop();
    }
}

const SAMPLE_RATE = 41000;

function useAudioPlayer() {
    const audioPlayer = new AudioPlayer();

    const reset = () => {
        audioPlayer.init(SAMPLE_RATE);
    };

    const play = (base64Audio) => {
        audioPlayer.play(base64Audio);
    };

    const stop = () => {
        audioPlayer.stop();
    };

    return { reset, play, stop };
}
Frontend Socket Connection and Chat Interface
With recorder_worker.js and player_worker.js, you can build the frontend WebSocket connection and chat interface. Below is a basic example of the chat interface.
Basic Chat Interface
This component manages the user interface for the voice-to-voice AI chatbot. Users can start or stop voice interaction and view grounding files based on RAG search results.
import { useState } from "react";
import { Mic, MicOff } from "lucide-react";

import { Button } from "@/components/ui/button";
import { GroundingFiles } from "@/components/ui/grounding-files";
import GroundingFileView from "@/components/ui/grounding-file-view";
import StatusMessage from "@/components/ui/status-message";

import useRealTime from "@/hooks/useRealtime";
import useAudioRecorder from "@/hooks/useAudioRecorder";
import useAudioPlayer from "@/hooks/useAudioPlayer";

function App() {
    const [isRecording, setIsRecording] = useState(false);
    const [groundingFiles, setGroundingFiles] = useState([]);
    const [selectedFile, setSelectedFile] = useState(null);

    const { startSession, addUserAudio, inputAudioBufferClear } = useRealTime({
        onWebSocketOpen: () => console.log("WebSocket connection opened"),
        onWebSocketClose: () => console.log("WebSocket connection closed"),
        onWebSocketError: event => console.error("WebSocket error:", event),
        onReceivedError: message => console.error("error", message),
        onReceivedResponseAudioDelta: message => {
            isRecording && playAudio(message.delta);
        },
        onReceivedInputAudioBufferSpeechStarted: () => {
            stopAudioPlayer();
        },
        onReceivedExtensionMiddleTierToolResponse: message => {
            const result = JSON.parse(message.tool_result);

            const files = result.sources.map(x => {
                const match = x.chunk_id.match(/_pages_(\d+)$/);
                const name = match ? `${x.title}#page=${match[1]}` : x.title;
                return { id: x.chunk_id, name: name, content: x.chunk };
            });

            setGroundingFiles(prev => [...prev, ...files]);
        }
    });

    const { reset: resetAudioPlayer, play: playAudio, stop: stopAudioPlayer } = useAudioPlayer();
    const { start: startAudioRecording, stop: stopAudioRecording } = useAudioRecorder({ onAudioRecorded: addUserAudio });

    const onToggleListening = async () => {
        if (!isRecording) {
            startSession();
            await startAudioRecording();
            resetAudioPlayer();

            setIsRecording(true);
        } else {
            await stopAudioRecording();
            stopAudioPlayer();
            inputAudioBufferClear();

            setIsRecording(false);
        }
    };

    return (
        <div className="flex min-h-screen flex-col bg-gray-100 text-gray-900">
            <main className="flex flex-grow flex-col items-center justify-center">
                <h1 className="mb-8 bg-gradient-to-r from-purple-600 to-pink-600 bg-clip-text text-4xl font-bold text-transparent md:text-7xl">
                    Talk to your data
                </h1>
                <div className="mb-4 flex flex-col items-center justify-center">
                    <Button
                        onClick={onToggleListening}
                        className={`h-12 w-60 ${isRecording ? "bg-red-600 hover:bg-red-700" : "bg-purple-500 hover:bg-purple-600"}`}
                        aria-label={isRecording ? "Stop recording" : "Start recording"}
                    >
                        {isRecording ? (
                            <>
                                <MicOff className="mr-2 h-4 w-4" />
                                Stop conversation
                            </>
                        ) : (
                            <>
                                <Mic className="mr-2 h-6 w-6" />
                            </>
                        )}
                    </Button>
                    <StatusMessage isRecording={isRecording} />
                </div>
                <GroundingFiles files={groundingFiles} onSelected={setSelectedFile} />
            </main>

            <footer className="py-4 text-center">
                <p>Built with Azure AI Search + Azure OpenAI</p>
            </footer>

            <GroundingFileView groundingFile={selectedFile} onClosed={() => setSelectedFile(null)} />
        </div>
    );
}

export default App;
Frontend WebSocket Component
This component establishes the WebSocket connection between the frontend and backend.
import useWebSocket from "react-use-websocket";

export default function useRealTime({
    useDirectAoaiApi,
    aoaiEndpointOverride,
    aoaiApiKeyOverride,
    aoaiModelOverride,
    onWebSocketOpen,
    onWebSocketClose,
    onWebSocketError,
    onWebSocketMessage,
    onReceivedResponseDone,
    onReceivedResponseAudioDelta,
    onReceivedResponseAudioTranscriptDelta,
    onReceivedInputAudioBufferSpeechStarted,
    onReceivedExtensionMiddleTierToolResponse,
    onReceivedInputAudioTranscriptionCompleted,
    onReceivedError
}) {
    const wsEndpoint = `/realtime`;

    const { sendJsonMessage } = useWebSocket(wsEndpoint, {
        onOpen: () => onWebSocketOpen && onWebSocketOpen(),
        onClose: () => onWebSocketClose && onWebSocketClose(),
        onError: event => onWebSocketError && onWebSocketError(event),
        onMessage: event => onMessageReceived(event),
        shouldReconnect: () => true
    });

    const startSession = () => {
        const command = {
            type: "session.update",
            session: {
                turn_detection: {
                    type: "server_vad"
                }
            }
        };

        sendJsonMessage(command);
    };

    const addUserAudio = (base64Audio) => {
        const command = {
            type: "input_audio_buffer.append",
            audio: base64Audio
        };

        sendJsonMessage(command);
    };

    const inputAudioBufferClear = () => {
        const command = {
            type: "input_audio_buffer.clear"
        };

        sendJsonMessage(command);
    };

    const onMessageReceived = (event) => {
        onWebSocketMessage && onWebSocketMessage(event);

        let message;
        try {
            message = JSON.parse(event.data);
        } catch (e) {
            console.error("Failed to parse JSON message:", e);
            return;
        }

        switch (message.type) {
            case "response.done":
                onReceivedResponseDone && onReceivedResponseDone(message);
                break;
            case "response.audio.delta":
                onReceivedResponseAudioDelta && onReceivedResponseAudioDelta(message);
                break;
            case "response.audio_transcript.delta":
                onReceivedResponseAudioTranscriptDelta && onReceivedResponseAudioTranscriptDelta(message);
                break;
            case "input_audio_buffer.speech_started":
                onReceivedInputAudioBufferSpeechStarted && onReceivedInputAudioBufferSpeechStarted(message);
                break;
            case "conversation.item.input_audio_transcription.completed":
                onReceivedInputAudioTranscriptionCompleted && onReceivedInputAudioTranscriptionCompleted(message);
                break;
            case "extension.middle_tier_tool_response":
                onReceivedExtensionMiddleTierToolResponse && onReceivedExtensionMiddleTierToolResponse(message);
                break;
            case "error":
                onReceivedError && onReceivedError(message);
                break;
        }
    };

    return { startSession, addUserAudio, inputAudioBufferClear };
}
Backend Server
The backend server relays audio streams to the OpenAI Realtime API and performs RAG searches on the knowledge base. Below is an example of how the backend server should look.
import { WebSocketServer } from 'ws';
import { RealtimeClient } from '@openai/realtime-api-beta';

export class RealtimeRelay {
  constructor(apiKey) {
    this.apiKey = apiKey;
    this.sockets = new WeakMap();
    this.wss = null;
  }

  listen(port) {
    this.wss = new WebSocketServer({ port });
    this.wss.on('connection', this.connectionHandler.bind(this));
    this.log(`Listening on ws://localhost:${port}`);
  }

  async connectionHandler(ws, req) {
    if (!req.url) {
      this.log('No URL provided, closing connection.');
      ws.close();
      return;
    }

    const url = new URL(req.url, `http://${req.headers.host}`);
    const pathname = url.pathname;

    if (pathname !== '/') {
      this.log(`Invalid pathname: "${pathname}"`);
      ws.close();
      return;
    }

    this.log(`Connecting with key "${this.apiKey.slice(0, 3)}..."`);
    const client = new RealtimeClient({ apiKey: this.apiKey });

    client.realtime.on('server.*', (event) => {
      this.log(`Relaying "${event.type}" to Client`);
      ws.send(JSON.stringify(event));
    });
    client.realtime.on('close', () => ws.close());

    const messageQueue = [];
    const messageHandler = (data) => {
      try {
        const event = JSON.parse(data);
        this.log(`Relaying "${event.type}" to OpenAI`);
        client.realtime.send(event.type, event);
      } catch (e) {
        console.error(e.message);
        this.log(`Error parsing event from client: ${data}`);
      }
    };
    ws.on('message', (data) => {
      if (!client.isConnected()) {
        messageQueue.push(data);
      } else {
        messageHandler(data);
      }
    });
    ws.on('close', () => client.disconnect());

    try {
      this.log(`Connecting to OpenAI...`);
      await client.connect();
    } catch (e) {
      this.log(`Error connecting to OpenAI: ${e.message}`);
      ws.close();
      return;
    }
    this.log(`Connected to OpenAI successfully!`);
    while (messageQueue.length) {
      messageHandler(messageQueue.shift());
    }
  }

  log(...args) {
    console.log(`[RealtimeRelay]`, ...args);
  }
}
In the messageHandler function, you can use the AISearch service to query the knowledge base and pass the results to the OpenAI Realtime API, which generates responses based on the search results.
Conclusion
In this article, we explored the process of creating a real-time voice-to-voice AI chatbot using OpenAI's Realtime API and Azure's AI Search. This approach combines AI with live chat capabilities to enhance customer support and interaction. By leveraging the GPT-4o-Realtime API, developers can build applications that support natural voice-based interactions, moving beyond traditional text-based AI conversations.
We detailed the necessary preparations, including setting up the GPT-4o-Realtime API, Azure's AI Search for RAG, and a basic chat frontend and backend server. Code examples for key components such as recorder_worker.js and player_worker.js were provided, highlighting the importance of a middleware WebSocket server for secure audio stream relay.
For those who prefer not to build their own voice-based AI chatbot, we recommend trying the real-time AI chatbot developed by Chat Data. This solution offers seamless integration and a robust voice interaction experience, allowing you to focus on enhancing customer engagement without the complexities of development.
To see Chat Data's real-time voice-to-voice AI chatbot in action, check out our YouTube video demo below showcasing its capabilities and user interface. Experience firsthand how this technology can transform your customer interactions and streamline support processes.